BR4 Manual
INSTRUCTION MANUAL
Introducing the BR4
Congratulations on the purchase of your BR4 Ballistic Rangefinder! The Revic BR4 features our new Revic solver with advanced wind and earth based effects to provide accurate, ultra-fast corrections in MOA, MILS, or our exclusive Shoot-To-Range Mode for use with BDC turrets. The data rich display simplifies the shooting process and the improved ranging tools feature target discrimination and a new long range mode. You can program your BR4 via a connected Bluetooth device, and with our Over The Air Update protocols you will always have access to the latest software improvements.
Section 1 - Quick Start/Battery Installment
To install/reinstall:
a. Remove the battery compartment cover by lifting up the hinged tab and turning counter-clockwise,
b. Insert the battery, negative end (-) first.
c. Re-insert the battery compartment cover and use the hinged tab to turn clockwise.
d. Press down on the hinged tab to secure.
2. Pull the tab on the lens cover to expose the transmit and receive lenses and begin use.
3. Press and release the FIRE button to power ON the unit. Each time the unit is powered on, the unit is ready to take a measurement.
4. Select a target, look through the eyepiece, and use the crosshair to aim at the target.
5. To acquire a range, press and hold the FIRE button until a range is acquired and displayed. The horizontal and vertical reticle lines are displayed while the laser is active. Release the FIRE button once the distance is displayed. If the distance is not displayed, release the FIRE button and repeat.
6. The Angle Modified Range (AMR or Horizontal Range) will display momentarily in the upper left quadrant of the display, then flash to the Line-of-Sight (LOS) range.
Powering OFF the BR4
If no buttons are pressed for 20 seconds, the BR4 will enter sleep mode to conserve battery power. After entering sleep mode, the BR4 will automatically power OFF in 60 seconds of no buttons being pressed. If a Bluetooth connection was established, the BR4 will automatically power off 5 minutes after the last button press. If the BR4 goes into sleep mode after a Bluetooth connection was established, you must reconnect the BR4 to the device.
Section 2 - Basic Operations
Display Backlight Adjustment
The display’s backlight intensity can be adjusted in the Quick Menu by short-pressing (short-press is simply pressing the button and releasing as opposed to press and hold which is holding the button down for 3 seconds and releasing) the Menu button. After waking from Sleep Mode or being powered on, the most recent brightness setting is recalled. Detailed instructions to change the brightness settings can be found in section 5: Brightness.
Aiming Box
The Aiming Box shown below is used to aim the range finder. The size of the display Aiming Box is the actual size and shape of the laser beam.

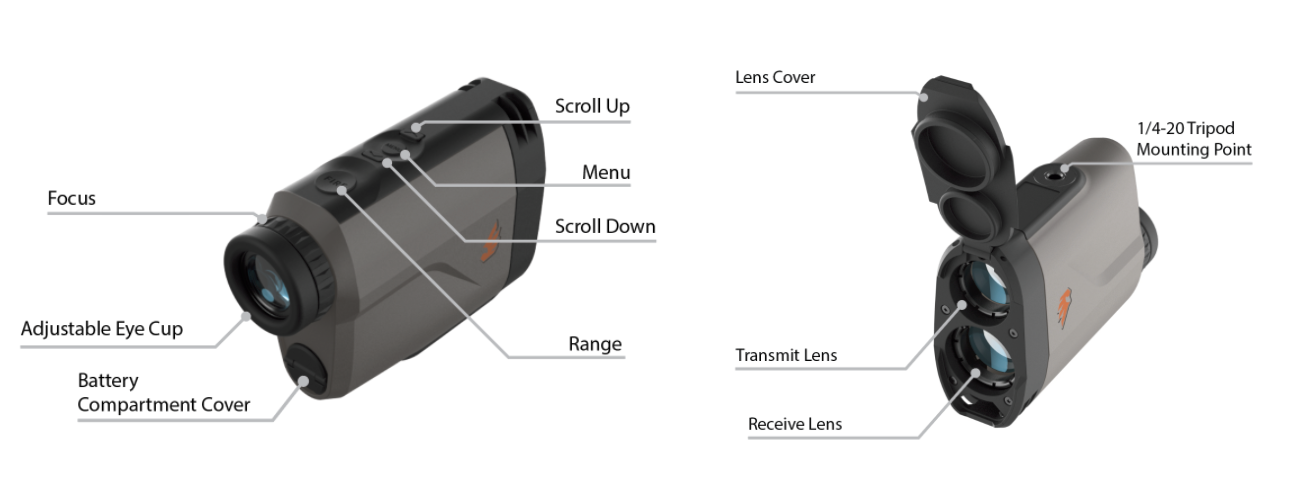
Eyecup
The adjustable eyecup is designed for comfort while blocking extraneous light. To adjust the eyepiece, turn it counter-clockwise while pulling up. To return the eyepiece to its original position, turn it clockwise and push down.
Focus Adjustment
The focus adjustment ring allows you to alter the BR4s focus to provide optimum clarity of the display and intended target. During assembly, the focus is set to infinity. To adjust the focus, press the Fire button to power the unit on and aim at a blank surface such as a wall, then turn the adjustment ring clockwise or counter-clockwise to maximize visual clarity. Once you are satisfied with the display clarity, check the focus on a target at distance.
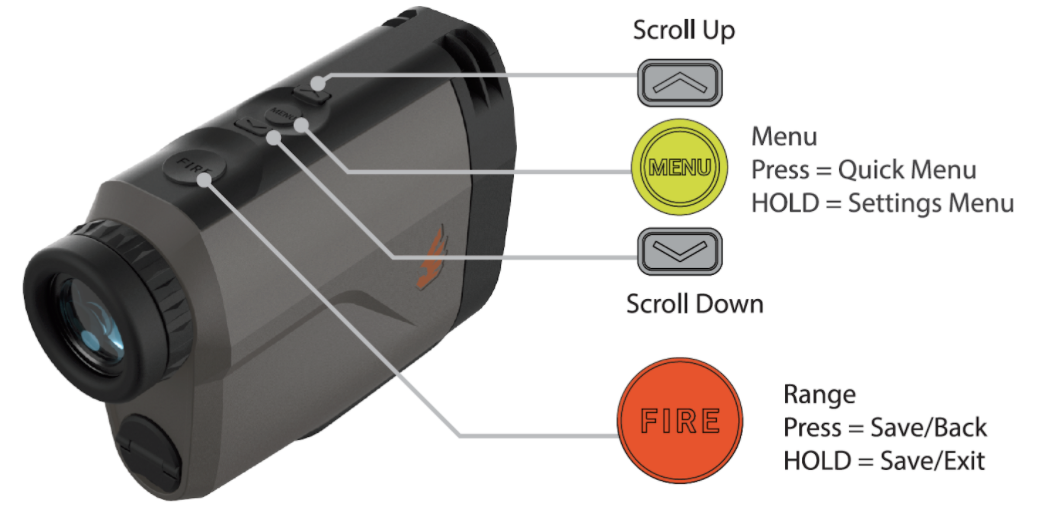
Buttons
The BR4 has a 4-button keypad located on the top panel of the instrument. See Figure 3: BR4 Buttons. The buttons provide easy access to the instrument functions, programming, and operating commands.